• Press & Publications
    • Partnerships
    • Media Kit
    • E-Design
  • Blog
    • Holiday Socials
    • Tablescapes
    • Birthday Parties
    • Christmas
    • Winter
    • Valentine's Day
    • Spring
    • St. Patrick's Day
    • Easter
    • Summer
    • Fourth of July
    • Fall
    • Halloween
    • Thanksgiving
    • My Home
    • Paint Colors
    • Design Tips
    • DIY Projects
    • Trim Work
    • ROOMS
  • IG Links
  • About
  • Contact
  • Home
Menu

Nissa-Lynn Interiors

Street Address
City, State, Zip
Phone Number
Love the space you're in.

Your Custom Text Here

Nissa-Lynn Interiors

  • PRESS & PUBLICATIONS
    • Press & Publications
    • Partnerships
    • Media Kit
  • DESIGN
    • E-Design
  • Blog
  • Entertaining
    • Holiday Socials
    • Tablescapes
    • Birthday Parties
  • Seasonal
    • Christmas
    • Winter
    • Valentine's Day
    • Spring
    • St. Patrick's Day
    • Easter
    • Summer
    • Fourth of July
    • Fall
    • Halloween
    • Thanksgiving
  • MY HOME
    • My Home
    • Paint Colors
    • Design Tips
    • DIY Projects
    • Trim Work
    • ROOMS
  • IG Links
  • About
  • Contact
  • Home

New Tile Floors Made Easy!

January 28, 2021 Nissa-Lynn Parson
33734FDB-39DE-4974-BA6B-D6E96C6C0C86.jpeg

Check out this is before and after! What a huge difference! 

We recently updated the tile in our master bathroom with a local company called 360 ROOMZ. They’re an exceptional company who services Dallas/Fort Worth and surrounding areas. Their goal is to make buying new flooring stress free - and they do! They send their flooring experts and quality samples to your home, so you can see how the flooring looks in your space. #sponsored

IMG_8760.jpeg
C071EE08-B52A-4B5B-8FDD-4E2FA43B9A01.jpeg

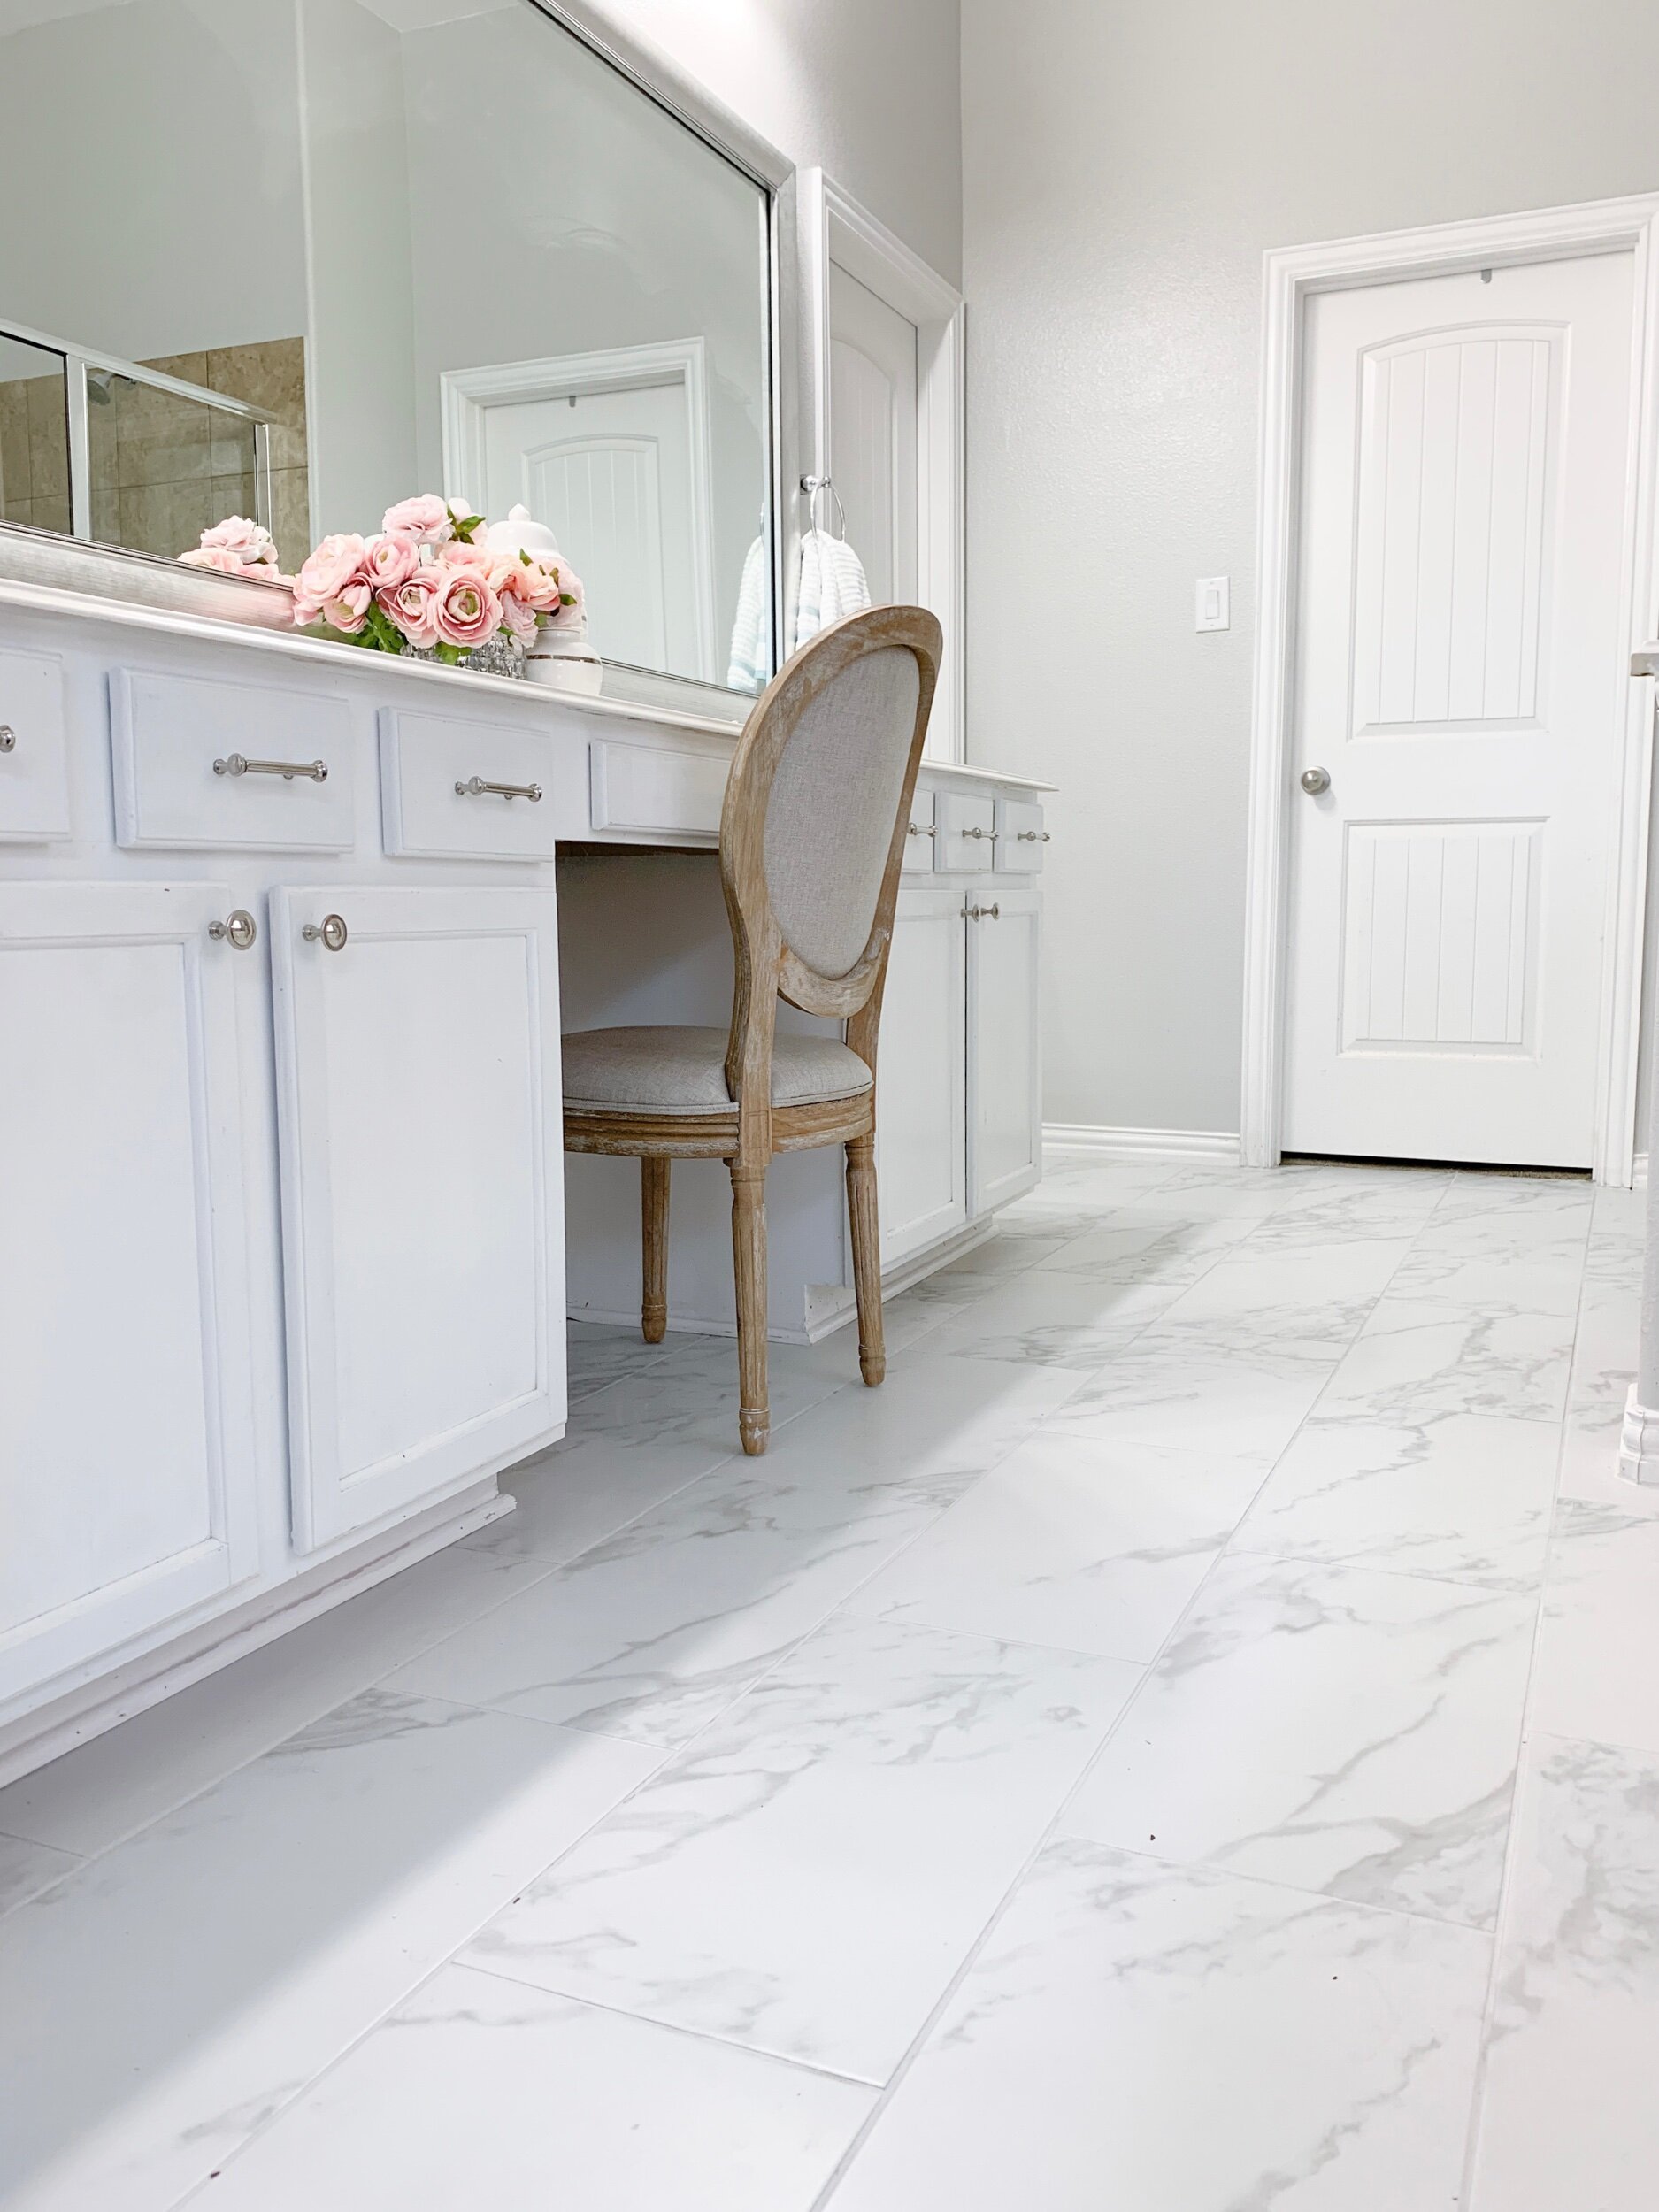
Their experts are so knowledgeable and they help you with the selection process. Flooring expert Chris came to my home and brought with him several tile options that for my master bathroom floor. We first laid them out in the kitchen and weeded them out based color, textures, shape and size. When we narrowed it down to a few choices we brought the final samples into the master bathroom to look at them against the bathroom cabinets and existing shower tile. Picking the final choose wasn’t stressful at all! I picked a faux marble tile plank with a light gray grout color called Frost. Flooring expert Chris came to my home and brought with him several tile options that for my master bathroom floor. We first laid them out in the kitchen and weeded them out based color, textures, shape and size.

IMG_6742.jpeg

When we narrowed it down to a few choices we brought the final samples into the master bathroom to look at them against the bathroom cabinets and existing shower tile. Picking the final choose wasn’t stressful at all! I picked a faux marble tile plank with a light gray grout color called Frost.

IMG_6755.jpeg

After all the old tile was lifted and removed from the floor, Julio checked the moisture level of the concrete. I was so impressed with his attention to detail as he not only had one meter for an accurate moisture reading - he had three! All the meters indicated the  moisture level was very high, so we let the concrete dry for a couple days. After which Julio came bank for an additional reading and determined that Red Guard needed to be put down to act as a moisture barrier for the concrete and a protection for the tile. He installed the Red Guard, we let it dry for a day and he was back the following morning with his assistant ready to lay the new tile.

216FDA1A-6169-422F-9D3C-0160E8F9C50E.jpeg
DD2D32A7-7AE7-4D1A-8D0B-3B2FE1B857DF.jpeg

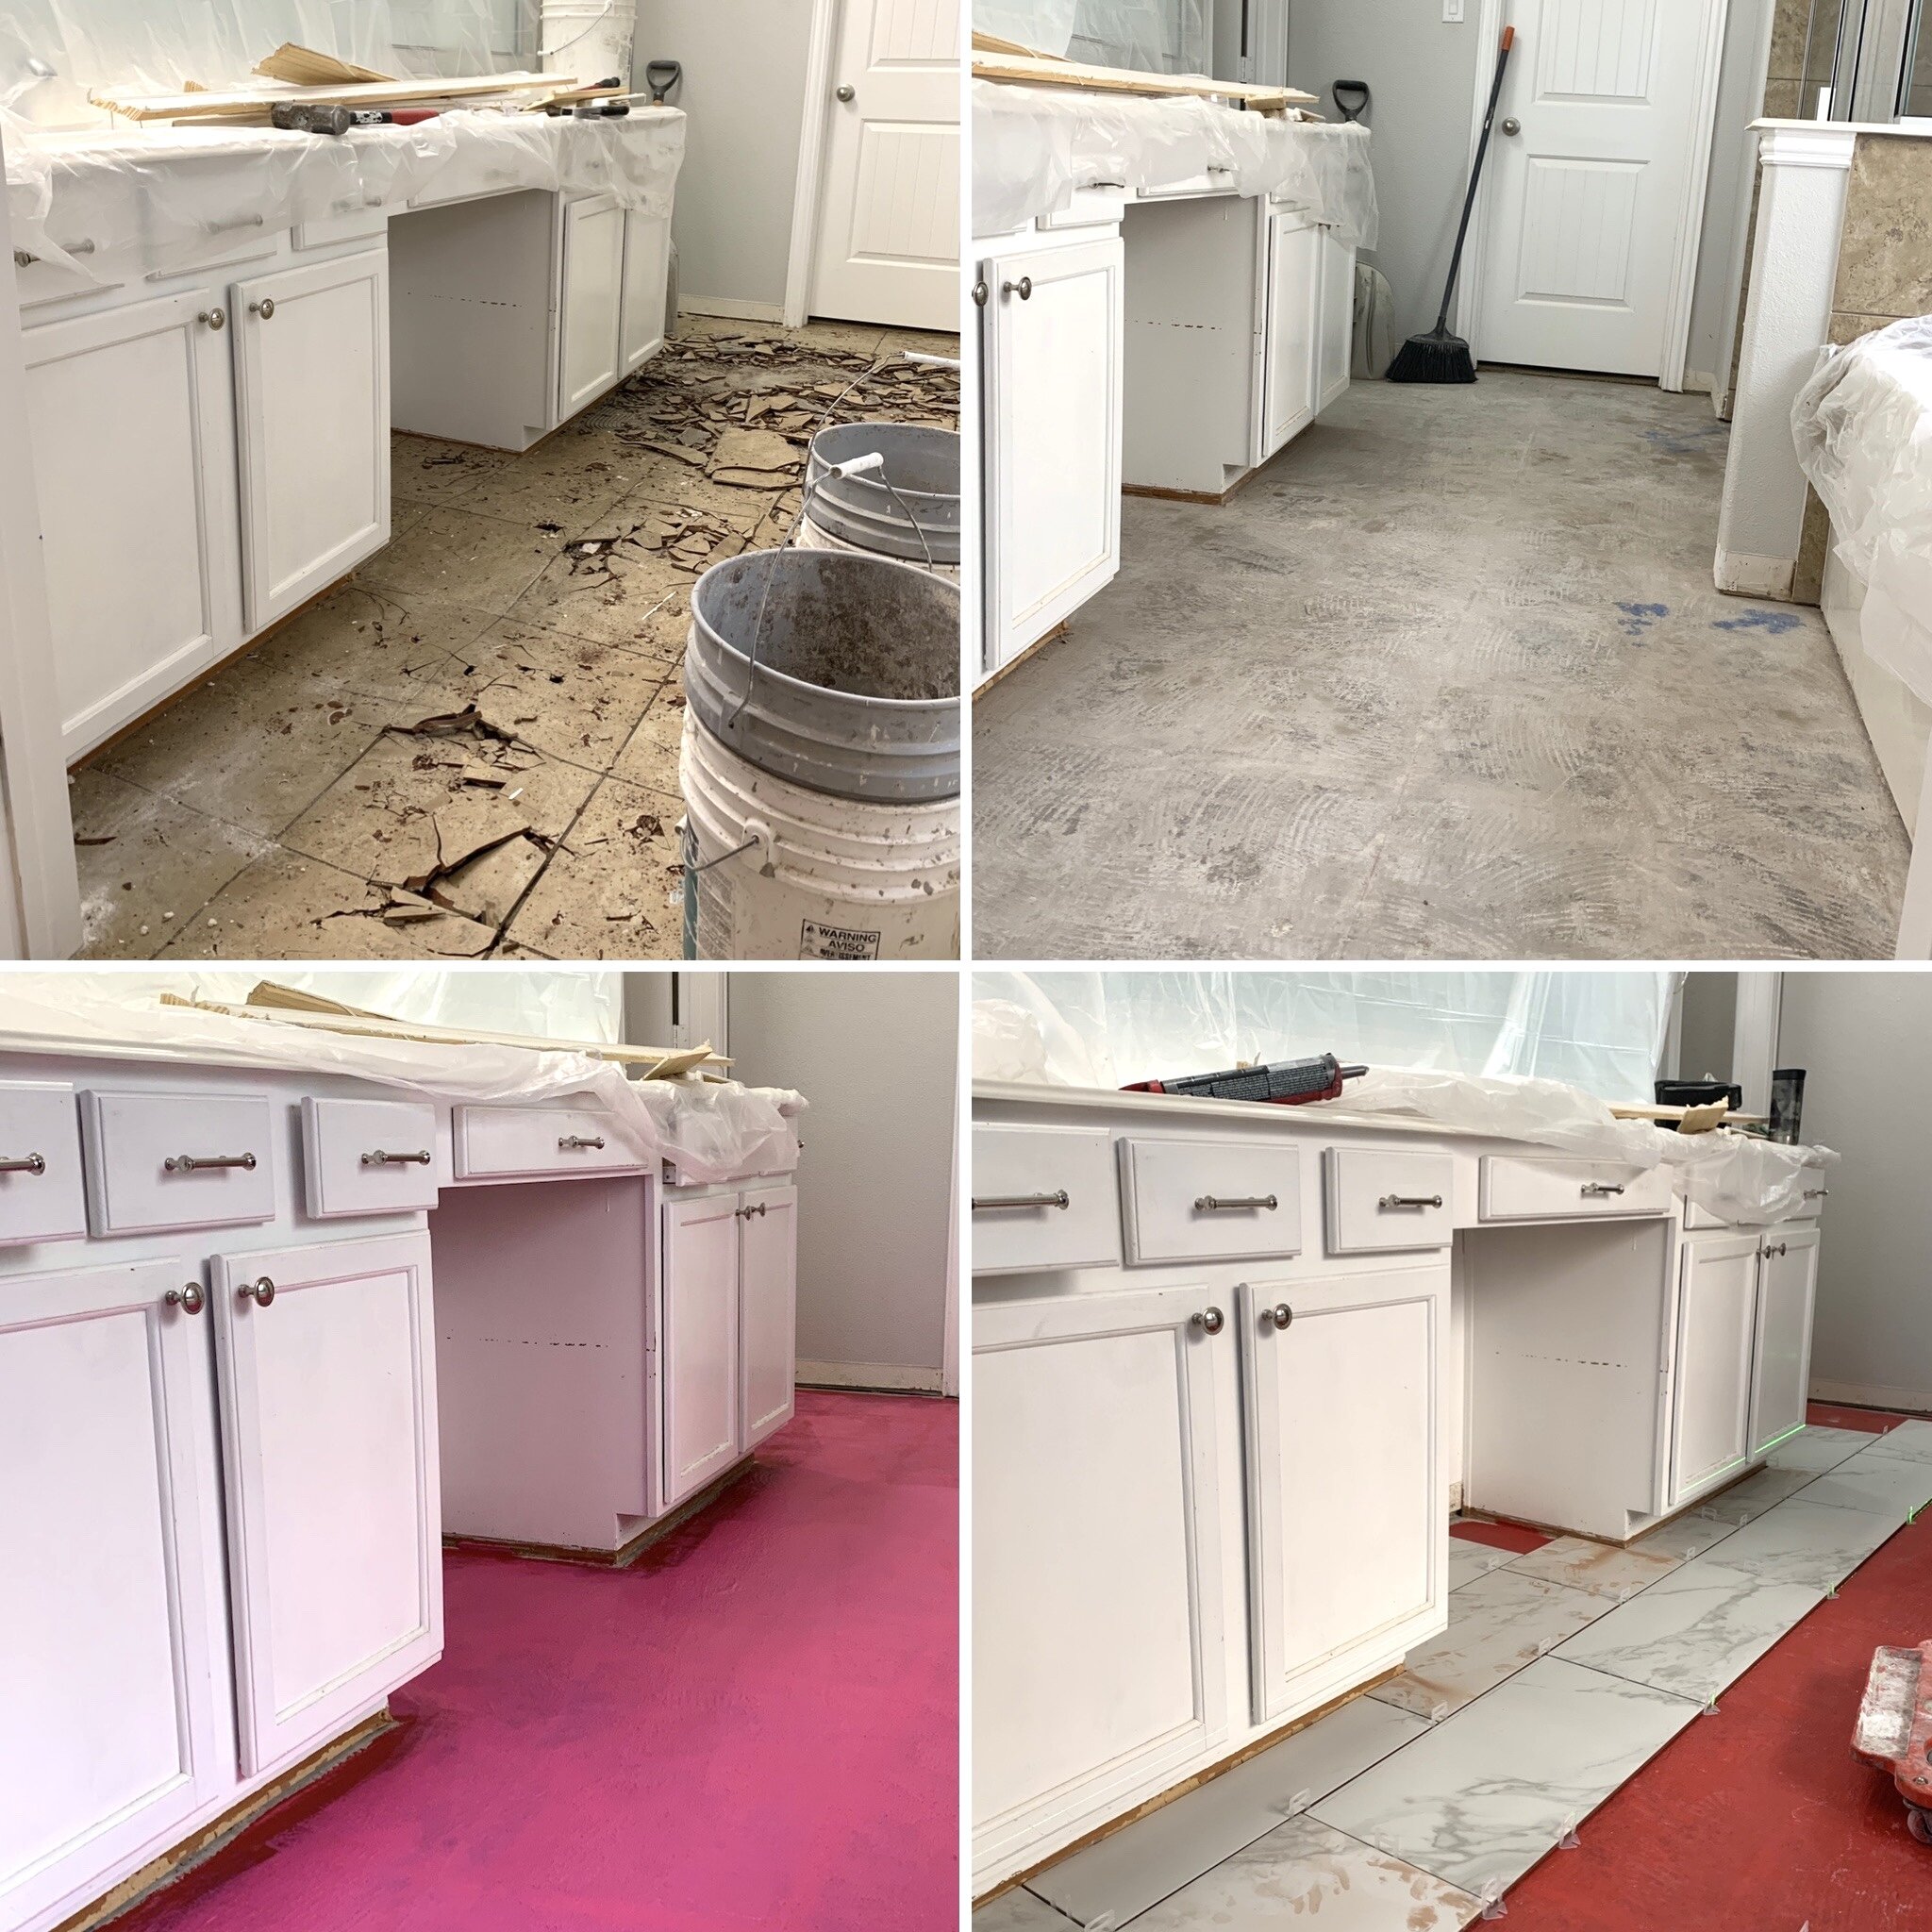
After tile was positioned and secure, they started grouting. They then washed the floors, and everything looked extraordinary! 

I’m still baffled how much of a difference new flooring can make and how stress free the process was! 

CCFD29A2-17E9-474F-B0D9-5B2D114F3E03.jpeg

Next up is to paint the shower tile white. Yes, there is a specific shower tile paint. Also I’m going to add in new decor including new towels and wall frames. Stay tuned!

In Before and After, Bathroom, ROOMS, Remodel Tags flooring, remodel, before and after, bathroom, tile, interior design, shop local, bathroomremodel, houseprojects

Big Difference with this Laundry Room Remodel!

July 25, 2019 Nissa-Lynn Parson
The “Before and After” of our laundry room!

The “Before and After” of our laundry room!

Before and After Laundryroom7.jpg

When we first moved into our home, the laundry room looked like this. It had one shelf with a bar for hanging clothes. One shelf wasn't enough storage, let alone any good at hiding messes. My husband Justin and I contemplated adding prefabricated oak cabinets from Lowes or Home Depot and painting them white, but the spaces was not wide enough for two sets of cabinets. Then we realized that in all honesty, we’re short people, so putting cabinets above the washer and dryer wasn’t really going to be something we were going to be able to access on a daily basis. And probably not without a step stool. Another realization was that our current washer and dryer were nearly ten years old and were not in the best condition. So we came up with a a great solution!

laundryroom4.jpg

We decided to rip out the existing shelf and replace with a multiple shelf arrangement that would look aesthetically pleasing, and be able to hold boxes and bins to store items we wouldn’t need often. At the same time we decided to purchase front loader machines with the pedestal bases that would store the soap, dryer sheets, etc, the things we need regularly, and down low where we could reach them. So we drew up what the new shelves were going to look like with the measurements, and Justin got to work! First he dismantled the current shelf, and removed the old washer and dryer.

laundryroom5.jpg
Laundryroom7.jpg

The he put in the the bead board and chair railing trim. He didn’t paint the trim until later. Here’s a photo of the right corner of the laundry room before we put in the bead board and painted the walls. After the bead board and chair railing trim were up, we started testing out paint colors. At this time we also got the new front loader machines.

laundryroom8.jpg

With the bead board in on the surrounding walls, Justin started assembling the shelves. We used mdf for the shelves for cost and convenience.

Laundryroom2.jpg
Laundryroom build.jpg

After the shelves were in, Justin added a 1x4 piece of wood for the backing for the crown molding. After he put the crown molding up, we painted the shelves, crown molding, and bead board white. We just used a pure Valspar pure white paint from Lowes.

laundryroom9.jpg
After the room was painted, we went back and added this shelf with hooks to hold backpacks, gym bags, and coats. I found the cute metal hanging basket at Home Goods.

After the room was painted, we went back and added this shelf with hooks to hold backpacks, gym bags, and coats. I found the cute metal hanging basket at Home Goods.

Loved framing my kid’s art work! It makes the room feel more inviting and the kids love showcasing their work!

Loved framing my kid’s art work! It makes the room feel more inviting and the kids love showcasing their work!

laundry room.jpg
In Laundry Room, DIY, DIY Projects, Remodel, ROOMS, Rooms Tags Laundry Room, DIY, DIY Projects, Remodel
Comment

Shop my Instagram here.

Happy Mother’s Day! 💐 I love this sign! It always makes me smile! Motherhood is not easy, and each stage of raising children comes with its own set of challenges and trials. (With five children ages 7-21, I totally understand). But for me it&r
Mother’s Day is right around the corner and what a more wonderful way to celebrate Moms than with a Mother’s Day Tea Party! But you don’t need to wait for Mother’s Day to have a celebration like this - you could host a si
This room is getting a refresh! It used to be my daughters’s room - decorated in gray and neutral tones. But now that she’s married and has a place of her own, it’s a guest bedroom. I’m going to give it a new look with new fur
Couldn’t let spring escape without sharing this fun article in the April/May issue of American Farmhouse Style Magazine! I’m so grateful to be a part of this wonderful publication as their Personality Profile. Thank you so much @americanf
ROOM MAKEOVER! (Swipe to see the before.)This dining room has come a long way in the last few years! I love the elegant, light and airy and feel it has now! On the opposite side of the room, that you can’t see in this pic, there is floor length

Powered by Squarespace